With a 90mm telescope, you can see some of the most famous objects in the night sky, including the Moon, the Andromeda galaxy, the great cluster in Hercules, and nebulae. The Moon is by far the easiest object to observe. You can see craters and mountains on its surface. The planets Venus, Mars, Jupiter, and Saturn are also visible.
Stargazing is a popular activity enjoyed by people of all ages. It can be done with the naked eye, binoculars, or a telescope.
A 90mm telescope is a great choice for anyone interested in astronomy. This powerful piece of equipment can give you a clear view of objects that are far away, including planets, stars, and galaxies.
In this blog post, I will discuss the features of a 90mm telescope and tell you about some things you can see with one. I will also provide tips on how to get the most out of your telescope.
Key Features of the 90mm Telescope
The 90mm telescope is a refractor telescope that uses lenses to gather light. It is a powerful tool that can magnify objects by up to 900 times their original size.
The 90mm telescope is also equipped with an equatorial mount, which makes it easy to track objects as they move across the night sky.
One of the best things about the 90mm telescope is that it is relatively compact and portable. It is a great option for anyone who wants to do some serious stargazing but doesn’t want to lug around a heavy piece of equipment.
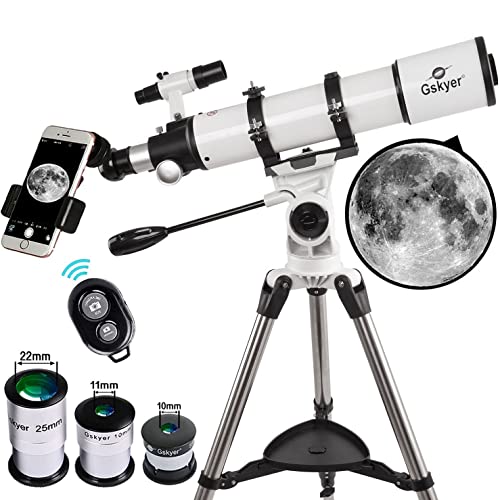
Gskyer Refractor Telescopes 600x90mm
Product Benefits:
- This high-quality telescope has a 600mm(f/6.7) focal length, a 90mm aperture, and a fully coated optics glass lens for stunning images.
- Comes with three replaceable eyepieces (24X, 60X,120X) and a 3x Barlow lens to increase magnification.
- Features an adjustable aluminum tripod for versatile viewing; the height can be adjusted from 31.5″ to 49″.
- The telescope is user-friendly, requiring no tools for assembly, and is quick to focus for easy operation.
What Can You See With a 90mm Telescope?
The 90mm is a great telescope for beginners. It is powerful enough to see some of the most famous objects in the night sky, but it is small and lightweight enough to transport it easily.
Here are some of the things that you can see with a 90mm telescope:
The Moon
The Moon is by far the easiest object to observe with a telescope. You can see craters and mountains on its surface.
It is important to note that a moon is a bright object, so it is best to observe it during its crescent or gibbous phases.
Jupiter and Its Moons
Jupiter is the largest planet in our solar system and can be seen with the naked eye. However, a 90mm telescope will allow you to see its four largest moons: Io, Europa, Ganymede, and Callisto.
You may also be able to see Jupiter’s Great Red Spot.
Saturn and Its Rings
Saturn is another planet that can be seen with the naked eye, but a telescope will give you a better view of its rings. With a 90mm telescope, you may also be able to see Saturn’s largest moon, Titan.
Venus and Mars
You can also use your 90mm telescope to observe the planets, Venus and Mars. However, it is important to note that these planets are often very close to the sun, so you will need to use special filters to avoid damaging your eyesight.
The Andromeda Galaxy
The Andromeda galaxy is a spiral galaxy about two million light-years from Earth. It can be seen with the naked eye, but it is best observed with a telescope.
With a 90mm telescope, you can see the galaxy’s spiral arms and central bulge.
The Great Cluster in Hercules
The great cluster in Hercules is a globular star cluster that contains about 300,000 stars. It is located about 22,000 light-years away from Earth.
With a 90mm telescope, you can see the individual stars that make up this cluster.
Cigar and Bode’s Galaxy
When two galaxies collide, they can create some interesting structures. The Cigar galaxy and Bode’s galaxy are two examples of this.
These two galaxies are currently in the process of colliding with each other. With a 90mm telescope, you can see the resulting structure, known as “The Mice.”
Orion Nebula
The Orion nebula is a cloud of gas and dust in Orion’s constellation. It is about 1400 light-years away from Earth.
With a 90mm telescope, you can see the four stars that make up the “Orion’s belt.” You can also see the sword, which contains the Orion nebula.
Eagle Nebula
The Eagle Nebula is a cloud of gas and dust located in the constellation Serpens. It is about 7000 light-years away from Earth. With a 90mm telescope, you can see the “Pillars of Creation.”
These pillars are columns of gas and dust illuminated by a nearby star.
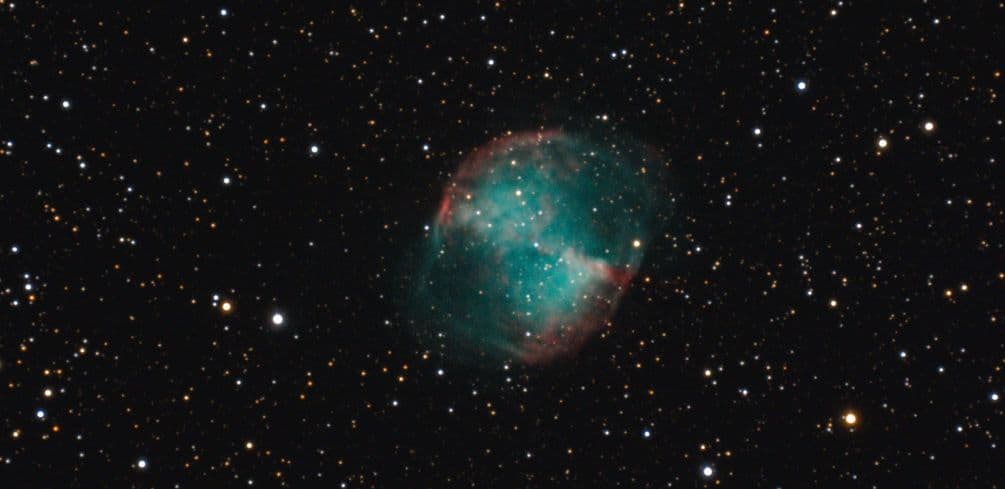
Dumbbell Nebula
The Dumbbell Nebula is a planetary nebula located in the constellation Vulpecula. It is about 1000 light-years away from Earth shown in the featured picture.
With a 90mm telescope, you can see its two lobes of gas, which give it its dumbbell shape.
Lagoon Nebula
The Lagoon nebula is a cloud of gas and dust located in the constellation Sagittarius. It is about 5000 light-years away from Earth.
With a 90mm telescope, you can see the central star, surrounded by a ring of gas and dust.
Double Cluster
The Double Cluster is a pair of star clusters located in the constellation Perseus. It is about 7000 light-years away from Earth.
With a 90mm telescope, you can see the two clusters, each containing about 500 stars.
There are countless other objects that you can see with a 90mm telescope. These are just a few of the most popular ones.
So, get out there and start exploring the night sky.
Benefits of Using a 90mm Telescope
There are many benefits to using a 90mm telescope. They include:
Learn about Astronomy
The biggest benefit of using a telescope is that it can help you learn about astronomy. A 90mm telescope will allow you to see many different types of astronomical objects, including galaxies, star clusters, and nebulae.
Observe the Night Sky
Another benefit of using a telescope is that it allows you to observe the night sky in greater detail. With a 90mm telescope, you can see finer details in the night sky, such as the individual stars that make up a cluster.
Take Amazing Photos
If you enjoy photography, you will be happy to know that a 90mm telescope can help you take some amazing photos. With a telescope, you can capture close-up photos of astronomical objects like the Orion nebula.
Improved Image Quality
Another biggest benefit of using a 90mm telescope is that it can help you get improved image quality. A 90mm telescope will allow you to see finer details in the night sky, resulting in better-quality photos.
Bonding with Family and Friends
Finally, a telescope is a great way to bond with family and friends. If you have kids, they will love looking through the telescope and seeing all the different astronomical objects. And if you have friends who are also interested in astronomy, they will be happy to join you in your stargazing adventures.
Tips for Using a 90mm Telescope
If you’re new to using a telescope, here are a few tips to help you get started:
Location
You need to find a location that has dark skies. The darker the skies, the better.
You also want to make sure that no trees or buildings are blocking your view of the night sky.
Setup
Once you’ve found a dark location, it’s time to set up your telescope. First, you need to assemble the telescope according to the instructions.
Once the telescope is assembled, you need to mount it on a tripod.
Focusing
Once the telescope is set up, you need to focus on it. To do this, you will need to use the eyepiece.
First, point the telescope at a bright object like the Moon or a star. Then, look through the eyepiece and use the focus knob to make the object appear as clear as possible.
Exploring
Once you’ve focused on the telescope, you’re ready to explore the night sky. Take your time and look at all the different objects you can see.
Don’t forget to take some pictures.
Stargazing can be a lot of fun, but it’s important to remember that safety comes first. Always make sure to follow the proper safety procedures when using a telescope.
How to Get the Most Out of Your 90mm Telescope
Now that you know what you can see with a 90mm telescope, let’s talk about how to get the most out of your 90mm telescope.
Here are some tips:
Choose the Right Location
When it comes to stargazing, location is everything. You want to find a place far away from the city lights to get a clear night sky view.
A 90mm telescope will allow you to see more stars and planets if you are in a dark location.
Invest in a Good Lens
If you want to get the most out of your 90mm telescope, you must invest in a good lens. A quality lens will allow you to see more detail and make it easier to take pictures.
Invest in a Good Mount
A good mount is essential for any telescope. It will help keep your telescope steady, giving you a clear night sky view.
A 90mm telescope is best used with an alt-azimuth or Dobsonian mount.
Get Familiar with the Sky
One of the best ways to get the most out of your telescope is to familiarize yourself with the night sky. This way, you will know where to look for certain objects.
There are many resources available that can help you learn about constellations and planets.
Explore Different Objects
As discussed earlier, a 90mm telescope will allow you to see many different astronomical objects. Take some time to explore all the different options and find your favorites.
With time, you will become a stargazing expert.
Take Your Time
Don’t rush your stargazing session. Take your time and enjoy all the different objects you can see.
If you rush, you’ll miss out on all the fun. It is also important to remember that not all objects will be visible every night. Some objects are best seen during certain times of the year.
Additional Tips for Using a Telescope
Here are a few additional tips to help you get the most out of your telescope:
Read the Manual
You should always read the manual before using any telescope. This will help you understand how to set up and use your telescope properly.
Practice Makes Perfect
Take time to practice using your telescope before taking it out into the field. This will help you get familiar with the controls and how to focus the telescope.
It takes time and practice to get good at using a telescope. Don’t get discouraged if you don’t get it right away.
Keep practicing, and you’ll eventually get the hang of it.
Dress Warmly
Make sure to dress warmly when using a telescope. You’ll be outside in the cold night air for long periods of time, and you don’t want to catch a cold.
Bring a Chair, Blanket, and a Flashlight
You should also bring a chair, blanket, and flashlight when using a telescope. The chair will allow you to sit comfortably while you stargaze.
The blanket will keep you warm, and the flashlight can be used to read maps or manuals.
Join a Club
If you want to learn more about stargazing, consider joining a local astronomy club. These clubs often have events where members can use each other’s telescopes.
This is a great way to meet other stargazers and learn more about the hobby.
Have Patience
Lastly, have patience when using a telescope. It takes time to find objects in the night sky.
Don’t give up if you can’t find something right away. Keep looking, and you’ll eventually find it.
How to Choose the Right 90mm Telescope
When choosing a 90mm telescope, there are a few things you need to keep in mind.
These include:
- The type of telescope
- The size of the aperture
- The focal length
- Your budget
- Your level of experience
Accessories that You Need for Your 90mm Telescope
There are a few accessories that you’ll need to get the most out of your 90mm telescope. These include:
A Good Telescope Mount
A good mount is essential for any telescope. It will help keep your telescope steady, giving you a clear night sky view.
A 90mm telescope is best used with an alt-azimuth or Dobsonian mount.
A Good Lens
If you want to get the most out of your 90mm telescope, you need to invest in a good lens. A quality lens will allow you to see more detail and make it easier to take pictures.
Finderscope
A finderscope is a small telescope mounted on the side of the main telescope. It is used to help you locate objects in the night sky.
Barlow Lens
A Barlow lens is an optical device placed between the eyepiece and the telescope. It increases an image’s magnification without changing the telescope’s focal length.
Camera Adapter
You’ll need a camera adapter if you want to take pictures with your telescope. This will allow you to attach a camera to the telescope to take long-exposure photographs.
Star Diagonal
A star diagonal is an angled mirror placed in the telescope’s optical path. It reflects the light 90 degrees, so you can view objects without looking directly through the telescope.
With these accessories, you’ll be able to get the most out of your 90mm telescope and see some amazing things.
A 90mm Telescope and Astrophotography
A 90mm telescope is a great choice for astrophotography. Astrophotography is the process of taking photographs of astronomical objects.
This type of telescope is large enough to see faint objects but small enough to be portable. A 90mm telescope can also be used for visual observations and pictures.
Factors that Make the 90mm Telescope good for Astrophotography
The following factors make the 90mm telescope good for astrophotography:
It is a Refractor Telescope
This type of telescope uses lenses to collect and focus light. Refractor telescopes are known for their sharp images.
They are also less likely to suffer from chromatic aberration, which can cause colors to appear fringed or distorted.
It has a Large Aperture
The aperture is the diameter of the telescope’s lens or mirror. A larger aperture means more light can be collected, which leads to a sharper image.
The 90mm telescope has an aperture of 90mm, which is large enough to see faint objects but small enough to be portable.
Focal Length
The focal length is the distance from the lens or mirror to the point where the light is focused. A longer focal length means more light can be collected, leading to a sharper image.
The 90mm telescope has a focal length of 900mm, which is great for astrophotography.
Portability
The 90mm telescope is small and light enough to be portable. This means you can take it with you wherever you go. You can also set it up quickly and easily.
Variety of Objects You Can See
With a 90mm telescope, you can see various astronomical objects. These include planets, stars, galaxies, nebulae, and more.
You can also use the telescope for terrestrial observations. This means you can use it to see things on Earth, such as buildings and mountains.
It is Affordable
The 90mm telescope is an affordable option for astrophotography. It is a great choice for beginners or anyone on a budget.
How to Use a 90mm Telescope for Astrophotography in 8 Steps
Now that you know what a 90mm telescope is and why it’s good for astrophotography, let’s discuss how to use one.
Step One: Location
The first step is to find a dark location away from light pollution. Light pollution can cause your images to appear washed out.
The best way to avoid light pollution is to find a spot far away from city lights.
Step Two: Confirm the Equipment and all Accessories are in Working Order
Before you begin, ensure your equipment is in working order. This includes the telescope, mount, tripod, camera, and any other accessories.
Step Three: Set Up the Telescope
Once you have found a dark location, it’s time to set up the telescope. First, assemble the tripod and mount it. Then, attach the telescope to the mount.
Step Four: Align the Telescope
The next step is to align the telescope. This process is called “polar alignment.”
To polar align the telescope, you will need to find Polaris, also known as the North Star. Once you have found Polaris, adjust the telescope’s position until it points directly at the star.
Step Five: Focus the Telescope
The next step is to focus the telescope. Point the telescope at a bright object, such as a star, to do this.
Then, use the focus knob to adjust the image until it is sharp.
Step Six: Attach the Camera
Now it’s time to attach the camera to the telescope. To do this, you will need to use a camera adapter.
The type of adapter you need will depend on the type of camera you are using.
Once the adapter is attached, turn on the camera and set it to ” Bulb” mode. In bulb mode, the shutter stays open for as long as the shutter button is pressed.
Step Seven: Take a Picture
Now it’s time to take a picture. To do this, point the telescope at the object you want to photograph.
Then, press and hold the shutter button. The longer you hold the shutter button, the longer the exposure will be.
Step Eight: Review the Picture
Once you have taken the picture, review it to ensure it is sharp and focused. If it’s not, try adjusting the focus knob.
You can also try taking another picture with a longer exposure.
Final Thoughts
You can see a variety of astronomical objects by using a 90mm telescope. These include the Moon, planets, stars, galaxies, nebulae, and more.
The 90mm telescope is an affordable option for astrophotography which is great for beginners or anyone on a budget. I hope this guide has helped you understand what can you see with a 90mm telescope and how to use one for astrophotography.
Please be careful and use at your own risk
None of the authors, contributors, administrators, or anyone else connected with StarryNova, in any way whatsoever, can be responsible for your use of the information contained in or linked from these web pages.
