
Did you know you can make an astrophotography flat frame lightbox with the following simple steps?
- Step 1: Take Measurements
- Step 2: Create a Box Structure
- Step 3: Add Lights to the Box Structure
- Step 4: Add the Translucent Sheet
- Step 5: Attach the Flat Frame Lightbox
Although astrophotography is a complex subject, you shouldn’t have to buy expensive accessories for your telescope. You can make a flat field box with the simple steps above and produce images with even lighting.
I have compiled all the necessary details on creating a working astrophotography flat frame lightbox without using complex materials or tools.
What is a Flat Frame?
A flat frame shouldn’t be confused with dark frames. Flat frames are part of calibration files that are useful in pre-processing astrophotography images.
Flat frames are meant to evenly distribute the light during astrophotography and produce a clear sky image.
Producing excellent flat frames is challenging because it is hard for a photographer to find the right balance of brightness. Even the distribution of brightness prevents images from having a bright center and dark edges.
Also, it reduces the occurrence of black spots caused by dust on the telescope appearing on flat frames.
What is an Astrophotography Flat Frame Light Box?
A flat field panel is one of the ways to balance the brightness when taking flat frames. Another alternative is using a flat frame lightbox to illuminate the images evenly.
Overall, the available options are expensive to purchase.
Making a DIY astrophotography flat frame lightbox is cost-saving and can perform as well as a flat field panel. Some people have tried using a white t-shirt as an alternative for a flat field panel, but it is tricky.
However, you will learn how to make an affordable astrophotography flat frame light box with locally available resources. The final product will do an excellent job like any store-bought light box or frame field light.
What You Need to Make an Astrophotography Flat Frame Light Box
There are a few essential items you need when creating a DIY astrophotography flat frame light box. All the materials and tools necessary for the project are available at your local hardware store or Amazon.
It would be best to collect all the materials for the project before you start creating a DIY flat frame light box.
- Box Structure Materials
You will need a tubular box structure to attach to your telescope. It would be best to create an elongated tube to ensure that light is well distributed.
You can build a box using cardboard, plywood, or foam. Foam is the easiest to manipulate when creating a tube for a light box.
Keep in mind that the box structure should be lightweight and portable if you like to travel when taking space images. Do a simple design that helps you increase the brightness in your flat frames to save time and money.
- Bulbs
Bulbs will be the light supply you need to increase and evenly distribute light. However, it would be best to choose bulbs with the proper voltage to avoid adding too much brightness.
It would help if you had low-voltage bulbs like the ones on torches.
High voltage bulbs saturate the CCD detector and affect the final images. It would be best to combine multiple bulbs to form a single light source for your light box.
You don’t have to spend cash on anything fancy, but consider buying a bulb holder with a 12V power supply.
- Tools
You will need a jigsaw, hacksaw, and electric drill to create a DIY astrophotography flat frame light box. Most of the tools will help you make an appropriate shape for the tunnel inside the box structure.
Additionally, it would be best to have super glue and electrical tape to attach the small parts to the light box. You can rent out the tools for the project if you don’t have them in your garage.
- Translucent Paper
Translucent paper diffuses the light from the bulbs before they enter the telescope. You need translucent paper if you want to take excellent flat frame images.
Perspex is the best translucent paper, and it is used for art. You can also opt for a translucent acrylic sheet if you can’t find translucent art paper.
Steps to Making a Light Box
I have compiled the steps you need to follow to create a DIY astrophotography flat frame light box. You will be able to make a working lightbox when you follow all the steps below.
Be patient with your construction so that everything comes out well.
Step 1: Take Measurements
Take measurements of the end of your telescope to capture the size of the tube inside your box structure. Take the outer measures of the telescope and the inner ones to create a sleeve on the end of the light box that fits perfectly.
The circular measurements of the telescope will be the dimensions of your light box tube.
Step 2: Create a Box Structure
Use white materials when creating a light box to the best result in light distribution when taking flat frame images. Therefore, use a white tube for the inner part of the light box for the best results.
For this DIY project, a form box structure works best. Start with a rectangular piece of form and draw circles for the outer and inner loop corresponding to your telescope dimensions.
Use a power saw to create the smaller circle through the form square until you have a tube. Use a low setting to enable easy cutting of the ring.
Cut out any extra pieces so that you end up with smooth edges.
Cut an inner circle a few inches on one end to fit it as a sleeve to the telescope when you are using it. Remove any excess pieces from the new cut to leave a smooth finish.
Try fitting the box structure over your telescope end to see if it works. The sleeve should fit snugly to ensure that light is well focused on the telescope.
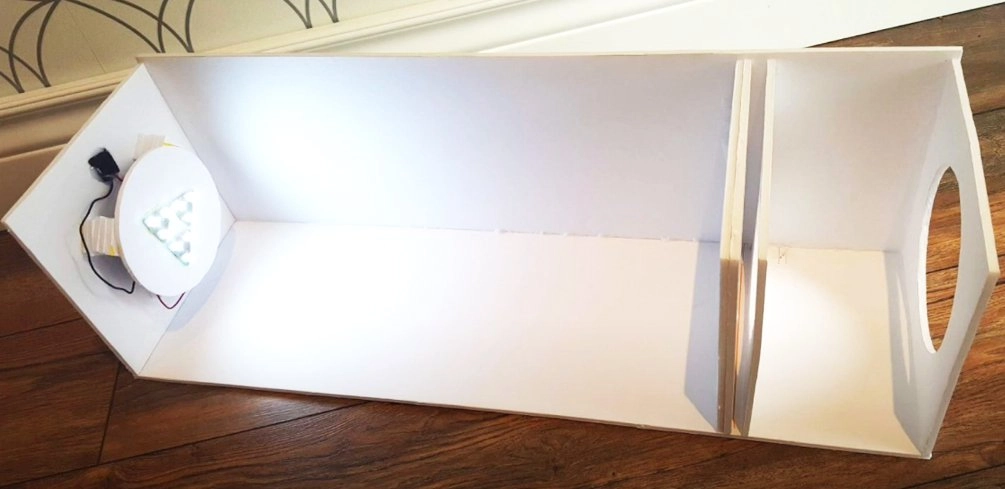
Step 3: Add Lights to the Box Structure
Lights need to go at the furthest end of the light box. You can use a bulb holder to assemble several small bulbs in one place.
A big telescope may require 2-3 bulb holders to cover the area of the tube. Attach the bulb holders with super glue or electric tape to the end of the box.
Consider using a potentiometer to moderate the brightness of the lights when doing initial trials. Overall, you can moderate the brightness or dimness of the lights with a potentiometer to meet your needs.
Step 4: Add the Translucent Sheet
The translucent sheet goes to the front of the telescope. Attach it with superglue on the end of the telescope sleeve, on top of the smaller tube.
Make sure it is clean before attaching it to the DIY equipment.
Step 5: Attach the Flat Frame Lightbox
Attach the flat frame lightbox to the telescope and turn the lights on. Take a few trial shots and calibrate the telescope until you get the best images.
Use your computer software to compare your earlier shoots and the current ones to identify the difference.
Conclusion
Using white materials for the project is the best way to ensure the DIY astrophotography flat frame light box works as expected. Anyone can build a flat field box at home with traditional materials and tools.
Moreover, you will save money when you use affordable materials from your local hardware store. Overall, the DIY flat field box is an excellent option for people who are doing astrophotography as a hobby.
Please be careful and use at your own risk
None of the authors, contributors, administrators, or anyone else connected with StarryNova, in any way whatsoever, can be responsible for your use of the information contained in or linked from these web pages.
